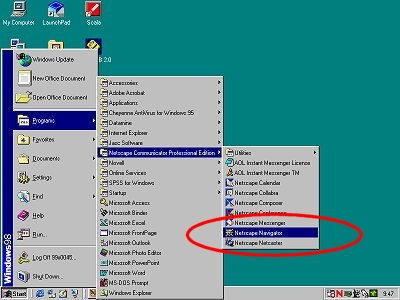
Start Netscape.
Double the Netscape icon on the desktop,

or use the Start button...
Start | Programs | Netscape Communicator
Professional Edition | Netscape Navigator
Select File | New | Blank
Page.
FONTS GDE GOOGLE HOME LINKS MAPS MICROWORLDS TD700-1 TD702 TIMETABLES TJ501 TJ521 TJ591 TJ641 TJ828 TJ853 TUTORIALS
Home > Tutorials & Notes
Starting a new web page
Editing an existing web page
Inserting images
Fixing missing images
Making linksLinking to targets within a web pageWorking with tables
Linking to targetUsing Ws-FTPNesting Tables
Background colour
Text Alignment
Cell Padding
Screen Dumps
Screen Capture
| 1 | Start Netscape. Double the Netscape icon on the desktop, |
|
|
or use the Start button...
|
|
|
| 2 |
|
|
| Contents |
| Start Netscape.
Double the Netscape icon on the desktop |
|
|
|
or use the Start button...
|
|
|
| 1 | Select File | Open Page... |
 |
| 2 | Select Composer. |
 |
| 3 | Press Choose File... |
|
| 4 | Select the file you want to modify. |
 |
| 5 | Press Open. |
|
| 6 | Press Open again. |
 |
| Contents |
Before inserting images into web pages make sure that the image file is saved to the J:\ drive.
| 1 | Click the Image button on the toolbar. |
 |
| 2 | Click Choose File... |
 |
| 3 | Select the file you want to insert. |
 |
| 4 | Press the Open button. |
|
| Contents |
| Theory:
The most common cause of missing images is forgetting to FTP the image
file(s) along with the HTML file. The first step in fixing a missing image is to find out the name of the
missing image file. See Golden Rule number 2.
|
| 1 | Right Click the mouse on the missing image. |  |
| 2 |
If you are running Netscape Communicator you will see a pop-up menu appear. Note the name of the missing image file. |
|
| 3 |
Start up Ws-FTP,
locate the missing file - usually this will be on the
J:\ drive - |
|
| Contents | ||
Another common reasons why images may appear as missing is using spaces in file names.
To fix this problem rename the image file removing the space, then delete the missing image and reinsert it.
| Another reason why images go missing is pasting
images into composer. This is not a good idea, if you copy an image and paste it into Netscape Composer Netscape creates a random file name for the image. In this case the name Netscape created is image9QV.JPG because you did not create this file yourself you did not realise that you had to FTP the file image9QV.JPG when you FTP'd the html file. To fix this problem locate the file image9QV.JPG and send it to the www folder using FTP. See Inserting Images for the preferred way to insert images into composer. |
|
| Theory:
Links are what turns the web into a Web - links are the fabric of the
web.
As long as the address is valid then the link should work. The MAIN reason
links fail is because they point to an invalid address. The main cause
for invalid addresses is spaces in file names, so when making links
DON'T USE SPACES IN FILE NAMES |
To create a link to another webpage using Netscape Composer
| 1 | Move the cursor to where you want the link to appear in your webpage. |
|
| 2 | Press the Link button on the toolbar. |
 |
| 3 | Type the text you want to display for a new link in this example we are going to type Golden Rules. |
 |
| 4 | Press the Choose File... button. |
 |
| 5 | Select the file you want to link to
|
 |
| 6 | Click Open |
|
| 7 | Click on OK |
 |
| You should see your new link |  |
|
| Contents | ||
| Theory: Before your link will work you must save the web page, and FTP the web page and the file that you made the link to, see the Webpage life-cycle Always check your links to make sure they work. The most reliable way to test a link is to ask a friend to check it for you. This will ensure that anybody within the university community can use your link. |
Linking to targets within a web page
Contents
| Theory:
Use targets when you want to link to a specific place in a webpage. If you want to a link at the bottom of a page to go back to the top of the page, place a target at the top of the page and a link at the bottom of the page that points to the target. In Netscape targets look like this: You only see targets in composer, you can only test targets in a browser like Netscape or IE Links that point to targets use the # – hash symbol– The following link points to a target at the top of this webpage: top |
To create a target
| 1 | Move the cursor to where you want the target. |
|
| 2 | Press the Target button on the toolbar. |  |
| 3 |
|
 |
| 4 |
Press OK |
 |
| 5 | You should see a target appear in your web page |  |
| 6 | If you place the cursor over a target the name of the target will appear in a pop-up box. |
 |
| Flash movie demonstrating the use of targets to create a table of contents. | ||
| Contents |
Making a link to a target
| 1 | Move the cursor to where you want the link to appear in your webpage. |
 |
| 2 | Press the Link button on the toolbar. |
|
| 3 | Type the text you want to display for a new link in this example we are going to type Top of Page |
 |
| 4 | Select the target you want to link to, in this example there is only one target in the page. |
|
| 5 | Press OK |
|
| 6 | You should see the link in the webpage. Before you can test the link link you must save the page and FTP it to the Web. You can only check links with a browser. |
 |
| Contents |
Tables are wonderful they give you lots of control over the layout of your
web page.
| 1 | To insert a table into your web page use the table button on the toolbar, |
 |
||||||||||||
| or choose Insert | Table | Table... from the menu, |  |
|||||||||||||
| 2 | The following dialogue box appears: |
 |
||||||||||||
| 3 | Click on OK you will see a table with 1 row and 2 columns appear in composer. |
|
||||||||||||
| 4 | If you want a table with more than 1 row or 2 columns enter the appropriate values before pressing OK. |
 |
||||||||||||
| 5 | Click on OK you will see a table with 4 rows and 3 clouds appear in composer. |
|
||||||||||||
| Contents |
You can put text or pictures into tables.
| This is cell has text in it. |
This cell has both text and an image in it. |
You can even put tables inside tables, this is called nesting tables.
This is cell has a table inside it
|
| Tables can have a background colour |  |
| Each cell can have a deferent colour.
To modify the properties of a cell right click within a cell and choose Table Properties.
|
 |
| Horizontal Alignment Default |
Vertical Alignment Default |
| Horizontal Alignment Left | Vertical Alignment Top |
|
Horizontal Alignment Center |
Vertical Alignment Center |
|
Horizontal Alignment Right |
Vertical Alignment Bottom |
| 1 |
|
 |
|||||||||||||||||
| 2 | then choose Cell padding |  |
|||||||||||||||||
| 3 | Experiment with different cell padding values to obtain the look you are after. |
|
|
||||||||||||||||
|
|||||||||||||||||||
| Contents | |||||||||||||||||||
Cells with no contents do not appear as you would expect them to in Netscape:
| Cells that have no contents do not appear as you might expect them to. | If you want an "empty" cell to appear with a normal border put one or more spaces in it. |
| The above cell has nothing in it. Notice how it has collapsed and does not look like a cell at all. | |
| The above cell has a single space in it. | The above three (3) cells have no contents. |
APA Citation:
Russell, R. (2003, December 3). Netscape page composer notes. Retrieved
December 3, 2003, from
http://www.rupert.id.au/tutorials/netscape/index.html