AutoHotkey | Android | Arduino | COMM140 | Fractals | Grammar Checkers | Knots | A Million Dots Activity | Processing | Processing for Scratch Users | Redbubble | Tutorials | Weather | World Time Meeting Planner | Favicon Generator.
Home > Tutorials > Auduino > Arduino UNO Demo > Basic Chaser
Home > COMM140 > Basic Chaser
Start with the basics.
1) If you need to download and install the Adruino IDE Integrated Development Environment
2) Connect the Arduino to the computer
3) Run the Adruino IDE
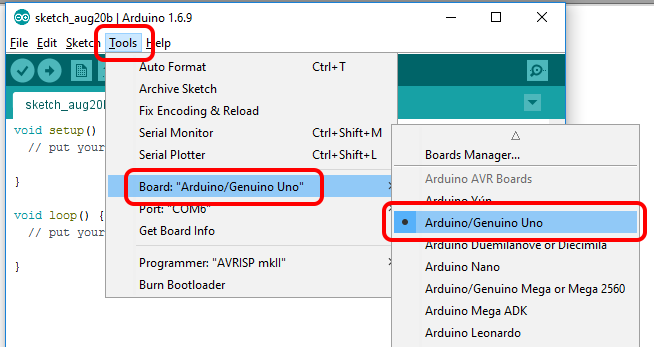
4) Select the correct board type within the IDE for this example I am using a KnockOffDuino Uno compatiable board.
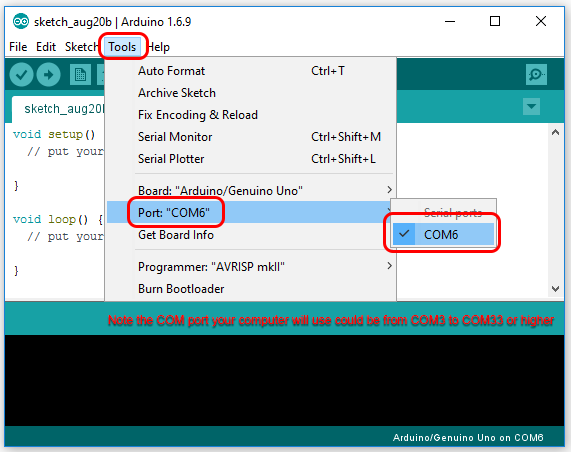
5) Identify and select the correct COM port
6) Create a new sketch and copyu and paste the example Basic Chaser code below
| /* Basic Chaser v001 Turns on the LEDs attached to pins 7 - 13 in sequience then turns them off in sequience. Repeats. This example code is in the public domain. modified 8 May 2014 by Scott Fitzgerald modified 10 August 2016 by rupert <dot> russell <at> acu <dot> edu <dot> au */ int delayMils = 100; // the setup function runs once when you press reset or power the board void setup() { // initialize digital pins 8 - 13 as an outputs. pinMode(7, OUTPUT); pinMode(8, OUTPUT); pinMode(9, OUTPUT); pinMode(10, OUTPUT); pinMode(11, OUTPUT); pinMode(12, OUTPUT); pinMode(13, OUTPUT); } // the loop function runs over and over again forever void loop() { // Turn on all leds in sequence digitalWrite(7, HIGH); // turn the LED on (HIGH is the voltage level) delay(delayMils); digitalWrite(8, HIGH); // turn the LED on (HIGH is the voltage level) delay(delayMils); digitalWrite(9, HIGH); // turn the LED on (HIGH is the voltage level) delay(delayMils); digitalWrite(10, HIGH); // turn the LED on (HIGH is the voltage level) delay(delayMils); digitalWrite(11, HIGH); // turn the LED on (HIGH is the voltage level) delay(delayMils); digitalWrite(12, HIGH); // turn the LED on (HIGH is the voltage level) delay(delayMils); digitalWrite(13, HIGH); // turn the LED on (HIGH is the voltage level) delay(delayMils); // Turn off all LED's in sequence digitalWrite(7, LOW); // turn the LED off by making the voltage LOW delay(delayMils); digitalWrite(8, LOW); // turn the LED off by making the voltage LOW delay(delayMils); digitalWrite(9, LOW); // turn the LED off by making the voltage LOW delay(delayMils); digitalWrite(10, LOW); // turn the LED off by making the voltage LOW delay(delayMils); digitalWrite(11, LOW); // turn the LED off by making the voltage LOW delay(delayMils); digitalWrite(12, LOW); // turn the LED off by making the voltage LOW delay(delayMils); digitalWrite(13, LOW); // turn the LED off by making the voltage LOW delay(delayMils); } |
/*
Basic Chaser v001
Turns on the LEDs attached to pins 7 - 13 in sequience
then turns them off in sequience.
Repeats.
This example code is in the public domain.
modified 8 May 2014
by Scott Fitzgerald
modified 10 August 2016
by rupert <dot> russell <at> acu <dot> edu <dot> au
*/
int delayMils = 100;
// the setup function runs once when you press reset or power the board
void setup() {
// initialize digital pins 8 - 13 as an outputs.
pinMode(7, OUTPUT);
pinMode(8, OUTPUT);
pinMode(9, OUTPUT);
pinMode(10, OUTPUT);
pinMode(11, OUTPUT);
pinMode(12, OUTPUT);
pinMode(13, OUTPUT);
}
// the loop function runs over and over again forever
void loop() {
// Turn on all leds in sequence
digitalWrite(7, HIGH); // turn the LED on (HIGH is the voltage level)
delay(delayMils);
digitalWrite(8, HIGH); // turn the LED on (HIGH is the voltage level)
delay(delayMils);
digitalWrite(9, HIGH); // turn the LED on (HIGH is the voltage level)
delay(delayMils);
digitalWrite(10, HIGH); // turn the LED on (HIGH is the voltage level)
delay(delayMils);
digitalWrite(11, HIGH); // turn the LED on (HIGH is the voltage level)
delay(delayMils);
digitalWrite(12, HIGH); // turn the LED on (HIGH is the voltage level)
delay(delayMils);
digitalWrite(13, HIGH); // turn the LED on (HIGH is the voltage level)
delay(delayMils);
// Turn off all LED's in sequence
digitalWrite(7, LOW); // turn the LED off by making the voltage LOW
delay(delayMils);
digitalWrite(8, LOW); // turn the LED off by making the voltage LOW
delay(delayMils);
digitalWrite(9, LOW); // turn the LED off by making the voltage LOW
delay(delayMils);
digitalWrite(10, LOW); // turn the LED off by making the voltage LOW
delay(delayMils);
digitalWrite(11, LOW); // turn the LED off by making the voltage LOW
delay(delayMils);
digitalWrite(12, LOW); // turn the LED off by making the voltage LOW
delay(delayMils);
digitalWrite(13, LOW); // turn the LED off by making the voltage LOW
delay(delayMils);
}

APA citation: