AutoHotkey | Android | Arduino | COMM140 | Fractals | Grammar Checkers | Knots | A Million Dots Activity | Processing | Processing for Scratch Users | Redbubble | Tutorials | Weather | World Time Meeting Planner | Favicon Generator.
Home > Tutorials > Arduino > Projects > Arduino Night Light
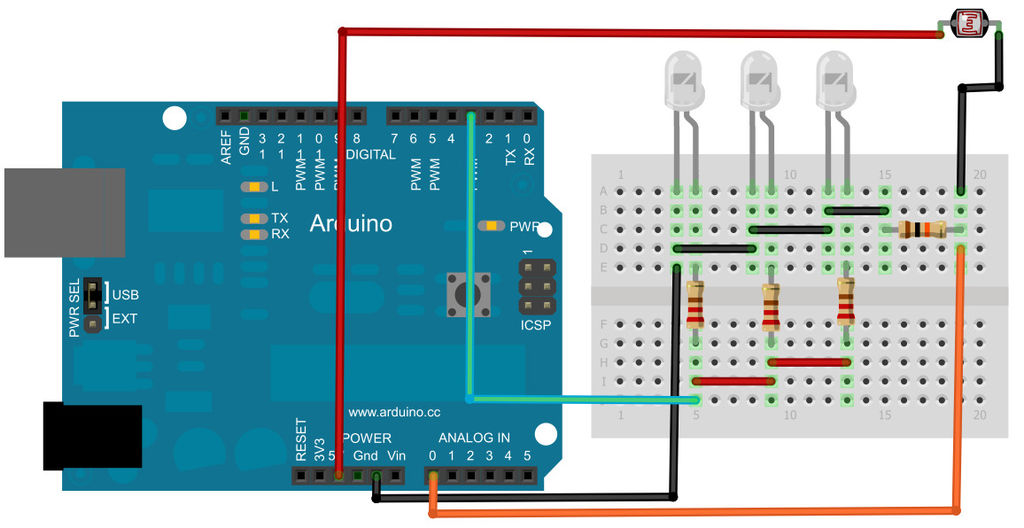
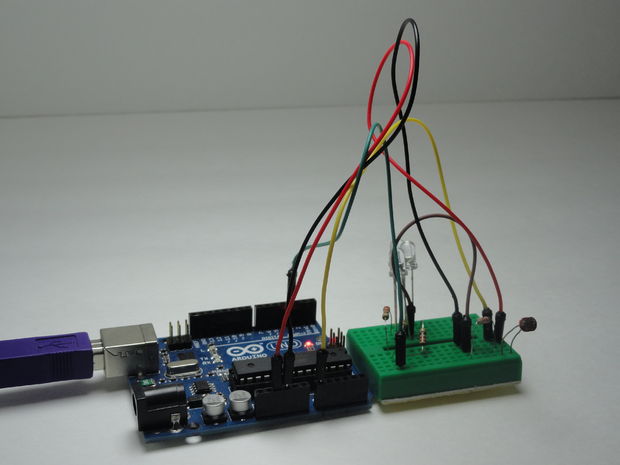
Color Changing Night Light with ATtiny
From http://www.instructables.com/id/Arduino-Night-Light/
void setup() {
Serial.begin(9600);
pinMode(3, OUTPUT);
}
void loop() {
int sensorValue = analogRead(A0);
if (sensorValue < 200) { // To change the point at which the light turns on change this value.
digitalWrite(3, HIGH);
}
else {
digitalWrite(3,LOW);
}
}
From
http://www.hobbytronics.co.uk/arduino-tutorial8-nightlight
Arduino UNO Tutorial 8 - NightLight
In this Arduino UNO tutorial, we are going to use a Light Dependent Resistor (LDR) to create a simple childrens bedroom nightlight which turns on automatically when it gets dark and turns off when it gets light.
An LDR's resistance changes depending upon the amount of light hitting the sensor. For the LDR we are going to use the resistance reduces as the light falling on the device increases. Used in conjunction with a 4.7K resistor this forms a simple voltage divider where the voltage across the LDR changes dependent upon the light.
We can then input this into one of the Analog to Digital inputs in the Arduino to measure the voltage. Then its a simple matter of checking whether the value is above or below a threshold value and to turn one of the outputs on or off.
The LDR we are using is available here
The circuit diagram is shown below. As the light increases, the LDR's resistance drops and hence the voltage across it drops. Thus the voltage across the resistor increases, so the voltage into the Arduino ADC increases. The opposite is true as it gets darker.
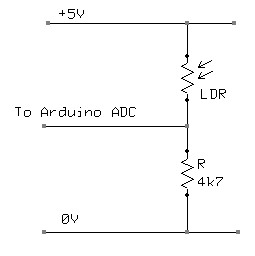
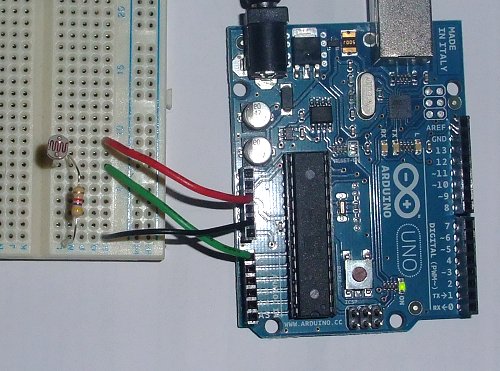
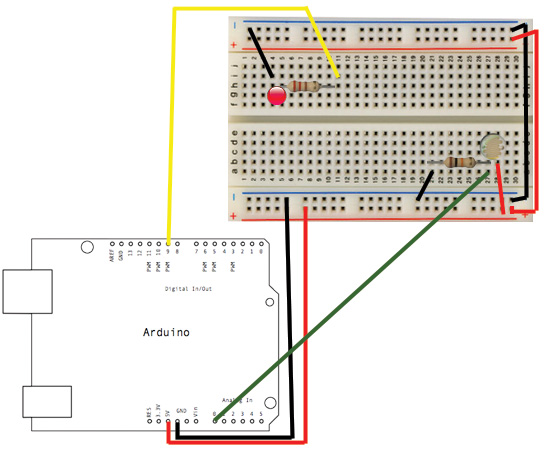
Here is the circuit laid out on a breadboard. 5V and 0V are taken from the Arduino. The input goes to pin A0
Below is the Arduino Sketch. In this sketch we are simply turning on the built-in LED if the ADC value drops below a specific value. To make a nightlight, a brighter led (with limiting resistor ~220 ohms) can be connected to the pin 13 output.
In the code you will notice that there are some serial output statements that are commented out. If you uncomment these you will see on the serial monitor the current value of the voltage being read by the Arduino ADC input. This value is between 0 and 1024. Cover the LDR with your hand and shine a light on it to see the effect.
Change the value in the code where the LED is switched on to an appropriate value.
/*
** Nightlight LDR test program
** Created 06 Feb 2010
**
** This example code is in the public domain.
** www.hobbytronics.co.uk
*/

int sensorPin = A0;            // select the input pin for the ldr
unsigned int sensorValue = 0;  // variable to store the value coming from the ldr

void setup()
{
  pinMode(13, OUTPUT);
  //Start Serial port
  Serial.begin(9600);        // start serial for output - for testing
}

void loop()
{
  // read the value from the ldr:
  sensorValue = analogRead(sensorPin);
  if(sensorValue<400) digitalWrite(13, HIGH);   // set the LED on
  else digitalWrite(13, LOW);   // set the LED on

  // For DEBUGGING - Print out our data, uncomment the lines below
  //Serial.print(sensorValue, DEC);     // print the value (0 to 1024)
  //Serial.println("");                   // print carriage return
  //delay(500);
}
http://www.codingcolor.com/microcontrollers/arduino-night-light-using-a-photocell/
/*

This example shows the output of an analogRead() of a Photocell.

By M.Gonzalez

www.codingcolor.com

The example code is in the public domain

*/


int photocellPin = 0;// Photocell connected to analog pin 0

int photocellVal = 0; // define photocell variable

int ledPin = 9;// LED connected to digital pin 9

int ledState = 0;//state of the led

int fadeDown = 30;//delay per fade

int fadeUp = 20;//delay per fade

int minLight = 100;//min light threshold

int maxLight = 100;//max light threshold


void setup() {

 //Serial.begin(9600);

  pinMode(photocellPin, INPUT);

  pinMode(ledPin, OUTPUT);

}

void loop() {

  photocellVal = analogRead(photocellPin);


  if (photocellVal < minLight and ledState == 0){

    fadeLed(1);

    //Serial.println("fade up");

  }

    else if (photocellVal > maxLight and ledState == 1){

    fadeLed(0);

   // Serial.println("fade down");

  }


}


void fadeLed(int num){

  if (num == 1){

     for(int fadeValue = 0 ; fadeValue <= 255; fadeValue +=5) {

     analogWrite(ledPin, fadeValue);

     delay(fadeUp);

    }

     ledState = 1;


 }

  else{

     for(int fadeValue = 255 ; fadeValue >= 0; fadeValue -=5) {

     analogWrite(ledPin, fadeValue);

     delay(fadeDown);

  }

   ledState = 0;

 }


}
APA citation:
Russell, R. (2016, July 05, 07:25 am). Arduino night light.
Retrieved July 18, 2026, from http://www.rupert.id.au/tutorials/arduino/projects/night_light/index.php
Last refreshed: July 18 2026. 11:20.49 pm


 This work is licensed under a Creative Commons Attribution-NonCommercial-ShareAlike 2.5 License.